Restringing the Hubbard-Di Veroli harpsichord
Copyright © 2011 by Claudio Di Veroli, Bray Baroque, Bray, Ireland, April 2011, rev. June 2023.
![]()
Abstract
In a separate webpage we have told the saga of Hubbard-Di Veroli harpsichord.
This webpage describes a recent project that has further improved this instrument.
We will review here the methods, materials, skills, information and processes needed to restring a French double based on a Hubbard kit.
The text will also provide guidelines on restringing any harpsichord with 8' and 4' stops.
1. THE RATIONALE. Why should one incur the risk, trouble and cost of restringing a harpsichord, even more so if well made, time-tested, resilient and nice-sounding? Because an even better sound quality will be the result. A detailed exposition on how to recreate the ancient harpsichord sound has recently been published (Irvin 2008). Needless to say, even the best modern replica of an ancient instrument cannot sound identical to the original: too many things are inevitably different, mainly the exact type of wood and centuries of ageing. However, a good replica should have a type and quality of sound approaching the original as much as possible, and the strings are paramount in tone production. “Since historical instrument designs were developed to enhance and modify the output of historical wire to produce the sound desired historically, the historical sound cannot be achieved by using a different wire in an historical design” (Irvin 2010).
Many ancient-type harpsichords are at present still strung with modern alloys of brass and steel. So was the Hubbard-Di Veroli instrument, built in 1972-1975 from a kit provided by the late Frank Hubbard of Boston, based on an original by Pascal Taskin, Paris 1769. In spite of the high quality of Hubbard’s kit, a few details differed from Taskin's original: harpsichord making has progressed greatly since the 1970’s, and some of those details can now be significantly improved upon. In the 2000x decade, having played in quite a few good instruments, I realised that the sound of my Hubbard-Di Veroli harpsichord, however good and powerful, could benefit from further improvement. The harpsichord maker Paul Y. Irvin has verified in practice that modern harpsichords based on ancient models, but strung with modern-alloy wire, and very especially Hubbard kits, significantly benefit in sound quality by being restrung with the traditional-alloy wire now available.
Another important issue is the stringing schedule. Hubbard for his kits instructed to follow a generic "Northern European harpsichord" stringing list (Hubbard 1963 p. 6) which, unfortunately, differs significantly from any of the French 18th century extant schedules: there is thus matter for further improvement . (On section 8 below we will comment on the updated list issued in 2007 by Hubbard Harpsichords Inc.).
I started working in this restringing project in 2010: I had devised schedules and restrung harpsichords in the past, and Paul Irvin through a long email interchange kindly provided me with additional guidance. [Mr. Irvin did not revise the present text and is thus not responsible for any inaccuracies it may contain]. This project report is expected to help other owners who may wish to improve similarly their harpsichords.
NOTATION: I will use in this text the common pitch designation CC, C, c, c', c", c'". Equivalences in another common system: C1=CC, C=C, c=c, c1=c', c2=c", c3=c'". For the accidentals, I do not denote all of them as sharps as is sometimes done in modern writings (C#, D#, F#, G# and A#) but I follow instead the traditional use in the era of harpsichords and unequal temperaments: C#, Eb, F#, G# and Bb.
- This webpage is not produced for commercial self-promotion: I am no longer active as harpsichord tuner or repairman and anywah I have at present no commercial relation with harpsichord makers, repairmen or string suppliers anywhere.
- I certainly do not mean this text to imply any wrongdoing from the original kit maker, on the contrary. Frank Hubbard was a pioneer in his time, and kits such as the one he sent me in 1972 were state-of-the-art when they were designed and produced. Hubbard Harpsichords Inc. to this day promptly provide spare parts when asked.
- The restringing operation described here needs familiarity with additional harpsichord maintenance operations such as action regulation and voicing of plectra, well covered in the existing literature and therefore not treated here.
- The author of this text declines any responsibility for the consequences of the actions, changes and risks associated with restringing a harpsichord: the reader is welcome to carry out (or ask a maker to do) a restringing project using this text as a baseline, but is doing so strictly at his/her own risk.
DISCLAIMER
2. THE REQUIREMENTS. This is a list of what you need to restring a harpsichord:
- To be conversant with changing harpsichord strings: either you are an experienced harpsichord technician or, at the very least, you have installed the existing strings in the instrument. Otherwise, you should avoid risks and have the work carried out by an expert.
- In particular, to be adept at making string "eyes", a specialised operation. Anyway, full directions are included below in the Appendix.
- To be conversant with harpsichord voicing. The new stringing is likely to produce minor changes in string alignment and loudness balance: a full check is needed after restringing, and some plectra will need revoicing.
- To have a list of vibrating string lengths—measured from the nut pin to the bridge pin and accurate to the nearest millimetre—for every string in the 4' and long 8' foot choirs of the instrument you are restringing. (Note: short 8' choir data is not needed: it is always strung identically to the long 8').
- To find out, in publications or online, a few stringing lists of ancient harpsichords similar to yours (in national school, era, model and scaling): you will need this information in order to deduce your final stringing list. For a 18th century French model, see the recent study by the author about Taskin harpsichord stringings (referred to below as "THS"): the THS webpage will be often referred to below, and ideally you should have it open in another "window" while you read this webpage.
- To find in the THS webpage on section 8 the formulae to compute, for each string, the Stress T, the Pull P and the Risk R.
- To be conversant with computer spreadsheets: you will need them for calculations, comparisons and graphs.
- A few hundred Euro or US Dollars worth of traditional-type harpsichord string coils supplied from a reputable specialised dealer.
- A tuning hammer ideally fit for the tuning pins of your particular harpsichord. You do not need to be a very proficient tuner, just acquainted with the basics: stringing a harpsichord does not require a very accurate tuning of the new strings.
- I also recommend a micrometre (USA micrometer) gauge to avoid confusions with wire sizes once the coils are out from their labelled envelopes. Every time you start working with a new coil, you should check the diameter or "size". Do not use a calliper: its error is too large for harpsichord wire. Use a digital micrometre, with error smaller than .0002": if bought online the cost is about €40 or U$S50.
- A good sense of hearing, allowing you to perceive the difference when you replace a string and change the alloy and/or diameter.
- Time. The planning stage may take days or even weeks to gather and analise the information. Once you have your stringing schedule and the strings, the process of stringing/restringing an instrument takes about 30 hours for a small harpsichord and twice as much for a large one. Avoid spreading the operation over many weeks, but do not hurry either: take your time, especially if you find issues that need analysis.
3. UNSUITABILITY OF ANCIENT OR GENERAL SCHEDULES. Ancient harpsichord makers, when stringing a new instrument, probably started with the stringing of a similar instrument and by trial and error improved wire alloys and sizes for some strings. Nowadays instead, when we are stringing a single instrument, we cannot experiment with alternative wires for each string: this would be expensive, impractical and certainly not good for the wrestplank. We need an "a priori" schedule of alloys and wire sizes, carefully calculated to guarantee a stringing so successful, that eventually very few strings—if any—will require further replacement. Luckily, modern musicology, technology and computers give us powerful tools that ancient makers did not even dream of.
More than one reader may think: ""Wait a moment, my instrument is an exact copy of an ancient one, down to materials, dimensions and general pitch, and the ancient schedule is known! Following it is the best policy, right?". Unfortuntely it is not so because, inevitably, any modern replica departs significantly from this ideal situation. This is why:
- The string lengths (or "scaling") of the original instrument may have undergone significant distortions after centuries of ageing.
- Modern measurements of the above also have small errors, maybe less than a millimetre per string, but adding to the total error.
- Even if the new instrument was made following an accurate soundboard map, the bridges will never follow precisely the specified curve.
- Once the bridge is pinned, the string lengths further depart from the planned values.
- Once the instrument is strung and pulled up to pitch, the tension distorts the case, shortening the scaling up to a few millimetres in the centre of the range.
Therefore, our instrument's final string lengths will always be some millimetres away from the original, yielding different Stresses and Pulls for every string (see THS section 8). Other factors intervene to further complicate matters:
- The modern instrument is tuned to a different pitch from the—unknown—one for which the original instrument was built and strung.
- The ancient stringing schedule of the original instrument is in most cases unknown (late French harpsichords are an exception).
- Ancient makers knew that "numbers cannot be established exactly. Some Clavessins take heavier strings than others" (Adlung 1768).
- It has always been known (Russell 1959 p. 19 and Hubbard 1965 p. 206) that the wire production methods of the harpsichord era could not yield very accurate wire diameters.
- Once average early wire sizes are suitably estimated, we find that 18th-century iron wire had diameters approximately .0075", .0085", .0095", .0105" and so on, unnervingly falling between modern sizes .007", .008", .009", .010" and .011". This makes it impossible to follow an ancient schedule using modern wire. [A few wire suppliers have recently started to produce sizes closer to the historical ones.]
At this point, blindly following the historical schedule of a similar instrument—or an average of ancient historical schedules—may result in broken strings and an uneven or sub-optimal sound quality. We will see below the alternative way: how a schedule as authentically-sounding as possible, based on ancient sources, was devised for the Taskin-based Hubbard-Di Veroli harpsichord.
4. FINDING AN AUTHENTIC-SOUNDING SCHEDULE FOR OUR HARPSICHORD. Let me further clarify the approach followed here: based on the scaling of the instrument to be restrung, for each string, an alloy and size will be selected so that the overall Pull curve for the whole string choir matches as much as possible a historical pull curve. [There are other minor factors such as impedance that cannot be calculated beforehand: however, in the author's limited experience, only a handful of strings, if any, may need further "a posteriori" replacement to improve sound quality and evenness.] Finding the historical pull curve to be followed—separately for 8' and 4' choirs—is a very important first stage, strongly dependent on the harpsichord model. We will not deal with this matter here: for the Hubbard-Di Veroli instrument I followed the curves determined in my recent Taskin harpsichord stringing (THS) essay. The historical pull curve is actually a range of pulls between two curves: the upper and lower envolvents (THS section 8).
average pull curve. This can be of help but, strictly speaking, is not necessary. Ideally the new schedule should yield pull curves as near as possible to a historical average. However, given other constraints such as breaking risk and wire sizes available, the result is perfectly satisfactory if the pull diverges somehow from the average, provided it keeps within the historical envolvents.
drawing the envolvents. Do not draw them with the mouse on a spreadsheet: if you change window sizes the curves may become displaced! The envolvents should be curves based on data in two spreadsheet columns, each one containing in each row (string) a number that is then shown in the chart as a "chart series".
The process—but not the final result—shown below in this text apply to any similar double-French harpsichord. For other models, the process described here and in THS can be used as a guideline for the reader in order to determine an historically-informed stringing schedule. For the Hubbard-Di Veroli harpsichord, eventually a schedule was found, optimised for the desired goals, contained within the historical envolvents and the constraints imposed by the instrument. This was not very difficult: it just required quite a few days of hard work—mostly on the personal computer— and attention to detail. Let us now see full details on how this was done and the results obtained.
5. THE BREAKING RISK ISSUE. Every restringing project has to include in the calculations the breaking risk R for each string. This will allow deciding—still at the planning stage—about the feasibility of the restringing project and, if affirmative, the optimal schedule to be followed. For the Hubbard French kit, it is worth noting that Taskin built his 1769 instrument for a pitch not far from A=400Hz. However, Hubbard supplied the kit as suitable for pitches up to modern A=440Hz. This did not cause issues with his "iron" strings, because he supplied modern steel instead. As for the brass strings, things were different: those at the top of the "brass range" would soon break, and Hubbard had to supply alternative modern alloys—such as beryllium copper—to mitigate the issue.
Tuning down the Hubbard double to "standard modern Baroque pitch" A=415.3 Hz certainly reduces the breaking risks, but they are still significant if we wish to restring the instrument with traditional alloys. This is because, from historical A=400 to A=415.3, we are increasing the stress of each string by 7.6%. In the Hubbard 1972 kit the situation is aggravated because the kit was designed with a treble scaling longer than Taskin's original, yielding a tension as much as 9.0% higher. The combined effects increase the stress by a factor of 1.076x1.090=1.173, i.e. a whopping 17.3% of additional stress in some treble regions. Thus, even though Taskin's original tensions for his iron wire were very safe, a Hubbard 1972 kit when strung in iron will frequently reach and even exceed a safe 80% of risk: therefore, as soon as we replace the kit's original steel strings with traditional iron wire, some strings will break frequently. To resolve these problems—in any instrument— it is important to forecast breaking risks as accurately as possible. Therefore, as clarified in THS, we have to pay attention to the breaking limit B specified by wire suppliers, and even carry out our own tests: not infrequently we will be relieved to find that a coil of wire has higher resistance than expected.
Ever since Mersenne (17th century) it has been known that the Stress is independent of wire size (if we select a larger diameter for a string, in order to get the same pitch we have to increase the Pull to a point where the Stress reaches the same value as before). From this property it is easy to assume that breaking risk is also independent from wire size, but is not the case, because—as you will find in the specs from the wire supplier—the breaking limit becomes higher as the wire becomes thinner (the so-called tensile pickup effect) . As for acceptable risk values, we have seen in THS that, for any harpsichord, a time-tested practical rule is as follows:
RED OR YELLOW BRASS: The breaking risk R should better not exceed 70 % and surely not 80%.
IRON OR STEEL: The breaking risk R should better not exceed 80 % and surely not 85%.
6. ALTERNATIVE SOLUTIONS FOR HUBBARD KITS. Paul Irvin has produced an elegant solution for the excessive breaking risks when restringing an old Hubbard French kit. He reduces the stress by tuning the instrument at "low French pitch" A=392 Hz, a full semitone lower than A=415.3 . He compensates for this by simultaneously converting the keyboards, originally with range FF-g''' non-transposing, so that the instrument becomes transposing. Two alternatives are possible:
- TWO PITCHES, obtained by reducing the width of the right keyboard block: A=392 with range FF-g''' / A=415.3 with range FF-f#'''.
- THREE PITCHES, obtained by removing the top f#''' and g''' keys: A=392 / A=415.3 / A=440, all with range FF-f'''.
After the above conversion, the kit is restrung with a schedule devised for the A=392 pitch: the risk is now within very safe limits, and the instrument is significantly improved at a relatively low cost. Unfortunately, Irvin's solution was not practicable for the Hubbard-Di Veroli harpsichord—and for similar Hubbard kits—for many reasons:
- I do not have the equipment and expertise necessary to carry out such a keyboard conversion myself, and I could not afford to pay a harpsichord maker for this expensive project.
- My right keyboard blocks are very narrow, and the conversion (with the TWO PITCHES alternative because I wish to retain the g''' for D. Scarlatti and Soler) would reduce their thickness to about one centimetre, not enough to withstand the coupling movement required by Hubbard's' 1972 very-heavy-framed German-made upper manual.
- Yet another reason why my instrument could hardly be made transposing, is because of the irregularities—both vertical and horizontal—in the keyboards provided by Hubbard and the way I compensated them with the jacks I carefully fitted back in 1975. If I now shifted the keyboards by a semitone, every key would raise different jacks and the action would be thrown hopelessly out of regulation.
- The only solution to the above issues would be to install new keyboards—custom built to the same octave span and key lengths—and re-regulate from scratch all the action. This expensive undertaking it out of my present possibilities.
I therefore preferred a solution that would allow for a successful restringing, yet keeping my keyboards and action unmodified, and also keeping, if possible, the present A=415.3 Hz pitch which allows playing with most present-day Baroque instruments. Following the envolvents from THS I devised a schedule and, as soon as I got to a string where the risk exceeded 80%, I decided between the two alternative mitigations:
(a) switching over to a smaller wire size— which has a higher breaking limit—while at the same time changing nearby string sizes in order to maintain a "smooth" pull curve.
(b) switching over to steel in the high treble, where the brighter sound of steel is hardly noticeable.
Finally, risks were minimised by carrying out previous tests (see below section THE TESTS).
RESTRINGING SEQUENCES. This matter is independent from the schedule. The most practical procedure for restringing, as recommended by many modern makers, is to remove first all the old strings—which allows for a thorough cleanup of the soundboard and easy repair of cracks—and then to work with one wire coil at a time: since 4' strings are best strung before their 8' counterparts, and 4' wire sizes are equal or smaller, one proceeds from treble to bass. I preferred however to follow a different sequence, which I find particularly useful when there are doubts about breaking risk and or a partial restringing is carried out. I proceeded from bass to treble, even if this entaileds working with two wire coils at the time, one for the 8' and another for the 4'. For every wire spool, I first removed the corresponding 8' strings and the 4' below them, then I replaced them: this method allows the opportunity—if need be—of last-minute changes in the schedule.
7. FINDING A FIRST SCHEDULE. For this purpose a special spreadsheet is needed—based on the formulae in section 8 of THS—where one enters a schedule and obtains the tensions. As for alloys, one should follow historical use. Harpsichords in 18th C France had alloy transitions standardised as follows (varying up or down by no more than a semitone):
- 8': Red Brass to Yellow Brass at D/Eb, Yellow Brass to Iron at B/c
- 4': Red Brass to Yellow Brass at C#/D, Yellow Brass to Iron at Bb/B
Having selected an initial set of transition points, one selects present-day traditional-alloy wire gauges. This "1st or initial" schedule may yield pull curves falling partially outside the envolvents. We resolve this by changing wire sizes, and even moving the above alloy transitions down one or two semitones in order to mitigate breaking risks in the brass. Thanks to spreadsheets it is easy to arrive, for each string choir, to a "2nd or compliant" schedule with a pull curve that
(a) follows ancient shapes,
(b) is as smooth as possible,
(c) lies within the historical envolvents, and also
(d) the stringing is such that risks are within safe limits.
In the process we should also try to use only the wire sizes in use at the time in France:
- Red Brass: .025" to .014"
- Yellow Brass: .018" to .012"
- Iron: .013" to .007" [iron and steel size .014" and thicker does sound well: it is—and was—avoided by the best makers]
Each spreadsheet chart—one for the long 8' and the other for the 4'—should include the following curves: lower envolvent, historical average (optional), upper envolvent, existing pull (if any), restringing pull. The breaking risk can also be included in the same chart, 1 Kg of pull in the axis also representing 10% of breaking risk.
8. CHANGES WITH RESPECT TO HUBBARD'S ORIGINAL STRINGING.
Lower 8' choir. We have seen above the departures of Hubbard kit's scaling from Taskin's original. Even more significant are the departures of Hubbard's recommended schedule (Hubbard 1963 p.6) from ancient ones (see the curve in magenta colour in section 10 below) and the implications in string pulls:
- At A=415.3 Hz, Hubbard's 8' pull curve in the lowest octave hovers around 4.7 Kg, against an average of 6.4 Kg in French 18th-century instruments.
- Around the transition from brass to iron, ancient schedules had an average pull around 5.7 Kg, but Hubbard instead went up very sharply, reaching 8.2 Kg in the note f.
- In the midrange, Hubbard's pull curve comes down to values nearer to historical ones, but in the treble the pull rises again, until at f''' it reaches 5.8 Kg, against the historical average in the top treble of only 3.7 Kg.
It is thus apparent that, for the purpose of our restringing project, we should completely ignore the non-historical Hubbard schedule of 1963. This was already apparent in 1974, when the Hubbard-Di Veroli harpsichord was strung with a thoroughly recalculated schedule, nearer to historical pulls.
Hubbard Harpsichords have recently issued, for pre-1980 Hubbard kits tuned at A=415.3 Hz, an updated list (Hubbard Harpsichords 2007 p.1), whereby the 8' in the thicker iron/steel range (9 notes c-g#) has an average pull of 6.5 Kg. This is certainly an improvement, but it is still significantly higher than Taskin's instruments at 5.7 Kg. Similarly, most early instruments have pulls in the top octave averaging 3.5 Kg, while Hubbard Harpsichords's new list averages 4.3 Kg. This 2007 list is certainly better than the 1963 one, but still has most pulls higher than the average of Taskin's instruments. In addition, the new list caters indistinctly for "Steel or Iron", but if iron is used, quite a few strings in the treble may have a high breaking risk.
4' choir. While the effect of restringing—with its changing pulls—on the Hubbard kit structure is not worrying for the 8', things are different for the 4'. In the kit at A=415.3 Hz the extreme bass has an average pull of 3.6 Kg, while restringing with historical values would average 5.0 Kg. The midrange is better but there is still one kilogram of difference for each string. Therefore, we cannot restring the 4' choir of an old Hubbard kit strictly following average historical pulls, because we would be increasing the total pull of the 4' choir by about 50 Kg. This would be borne by the bass and midrange sections of the 4' hitchpin rail ("boudin"), which in Hubbard's kit is a piece of soft poplar that is not particularly strong: the risk is to induce a significant distortion in the soundboard, affecting the functionality of the 4' bridge. The solution is a minor compromise: our "2nd or compliant" schedule still follows historical pulls, but for the bass and midrange of the 4', where the envolvents give us a relatively ample range, we select wire sizes yielding pulls nearer to their minimal rather than average values. This allows to increase the total pull over the boudin by only 13 Kg, from 208 Kg to 221 Kg (less than 6%): also, most of the increase lays in the bass range, where the boudin is more resistant because it is wider and nearer to its attachment to the spine liner.
9. THE TESTS. Once we have our new schedule ( "2nd compliant"), before buying a full set of string reels and restringing, it is good to carry out some simple tests.
A. TESTING PULLS OVER TRANSITIONS. This test shows whether the harpsichord will benefit from changes in the pull curve. It is a very simple test that does not require any change in a harpsichord, only knowledge of the existing schedule and good hearing. For every transition to a smaller wire size, you compare the sound of the two strings. The second one has a lower pull, the reduction being as small as 8% (from .024" to .022%) or as large as 27% (from .016" to .014"), 16% being the average. If the pull is what the instrument needs, the first note will be a few percentage points above the ideal, the second note a few points below, and no difference whatsoever in sound quality will be perceived. If however the first string sounds slightly better (or worse) than the other, then the string choir benefits from a higher (or lower ) pull in that region of the keyboard's range. It is now good to check that these higher (or lower) pulls are also found in the spreadsheet chart for the new schedule. The coincidence (or else) may not be easy to spot, because the new schedule may have changes in different places: what matters here is to check that there are no significant contradictions. In my Hubbard-Di Veroli, the transitions in steel strings showed no clear preference, but all the transitions in brass strings were consistent in having the first(lowest) note of each pair sounding slightly better than the other one. This proved conclusively that the instrument required higher pulls in the bass: this was also in full agreement with the new schedule, as shown in the charts below.
B. TESTING RESTRINGING RISK. These tests show the improvement to be expected by restringing with new alloys and sizes: it also allows gauging the "practical strength" of the different alloys, providing an accurate estimate of the breaking risk. For the Hubbard 1972 kit, the "2nd compliant" schedule showed "peaks" in the breaking risks curve for the following strings:
- lower 8' red brass top note (D)
- lower 8' yellow brass top note (Bb)
- lower 8' iron .009" top note (g')
- lower 8' iron .008" top note (a')
- 4' red brass top note (C#)
- 4' yellow brass top note (G)
The test consisted of buying the required traditional harpsichord wire reels and restringing the six test strings listed above, keeping the old ones as a temporary "backup". The test strings were brought up to pitch in stages: first a tone below final pitch, a few days later a semitone below and days later up to final pitch. Two weeks later—to allow for the strings to settle—the following tests were performed:
- The new strings were compared with their neighbours to ascertain the degree of tone improvement: blind tests were carried out and results noted.
- The new strings were then pulled up by a semitone above their desired pitch: this is the safety test, and strings should resist this one without breaking.
- Finally they were pulled up slowly until they broke, yielding valuable information on their real-life breaking limit, and confirming safety factors for the whole restringing.
Luckily, the 2nd and 3rd test above proved that my initial caveats about breaking risks for my instrument were too pessimistic, and I was able to produce a "3rd or final" schedule, less dependent on breaking risk and fully following historical pulls, especially in the 8'.
C. TESTING TONE IMPROVEMENT. As regards the tests A above, let us first note that the Hubbard-Di Veroli was strung in 1974 with a schedule significantly nearer to historical ones than Hubbard's 1963 list. Therefore, I expected for my instrument much less of an improvement in tone quality, compared with a typical Hubbard kit strung with his 1963 schedule. Therefore, I was happy with the results from the tests, showing a significant improvement in the brass, with a stronger fundamental. The improvement was found much less significant in the upper half of the range: even if iron and steel strings feel very different when handled, the change produced by restringing the treble with iron—in this particular instrument—is merely a slight mitigation of the excessive brilliance of steel. Eventually I found that using Iron was a significant improvement in the 8' in the four notes B-d, where it also provided for a seamless transition brass-iron-steel. From eb upwards, the "principle of diminishing returns" (and the higher breaking risk) applied and I left old steel strings alone.
10. THE FINAL SCHEDULE. Find below—by decreasing frequencies as usual in the literature—the "3rd or final" schedule for the Hubbard-Di Veroli harpsichord. Please note, as said above, I only applied this restringing to the range FF-d. The instrument is tuned sometimes in Standard French Temperament (Rousseau's ordinaire) others in Barnes or Vallotti: the latter was used for the frequency calculations. Wire sizes below are in inches.
A=415.3 Hz
8' 4'c#'''- g''' Steel .007" bb''- g''' Steel .007"
e'' - c'' Iron .008"
f' - eb'' Iron .009" f' - a'' Iron .008"
bb - e' Iron .010" f# - e' Iron .009"
f# - a Iron .011"
eb - f Iron .012" c# - f Iron .010"
c - d Iron .013" (1) A - c Iron .011"
B Yellow Brass .013" (3)
G# - Bb Yellow Brass .014" G# Iron .012" (1),(2)
F - G Yellow Brass .016" F# - G Yellow Brass .012"
Eb - E Yellow Brass .018" (1) E - F Yellow Brass .013"
C# - D Red Brass .018" D - Eb Yellow Brass .014" (1)
BBb - C Red Brass .020" BB - C# Red Brass .014"
GG# - AA Red Brass .022" GG - BBb Red Brass .016"
FF - GG Red Brass .024" FF - FF# Red Brass .018"(1) These schedules "repeat sizes in alloy transitions" (see THS at the end of section 8). .
(2) In order to strictly follow the typical historical brass-to-iron transition point, here we would need Yellow Brass .011": unfortunately, this material yields a risk greater than 80%. This is because Hubbard's 1972 kit follows here the original Taskin scaling meant for A=400 Hz: when strung to A=415.3 we have an increase of 8% in stress. The author first tried Yellow Brass .011" but, not surprisingly, it broke when reaching final pitch. Therefore it would have been unsafe even for Taskin, and indeed the thinnest Yellow Brass he ever used was Gauge 6, i.e. .0118" [even though Gauge 7 or .0106" was available, and used in Corrette's list for the 4' Bb].
(3) As shown in the chart below, this yields a risk of 76%. If you find that your strings break, use instead Iron .013", with risk 51%. Pull will be 5.24Kg, still within envolvents and yielding a smooth inaudible brass-iron transition.
The charts below show that the above schedules follow the traditional alloy transitions and yield pulls that closely follow Taskin's averages and envolvents (see THS section 8). For the high-risk red dots, 7 and 8 in the Y-axis mean 70% and 80% of breaking risk: no string reaches 80%.
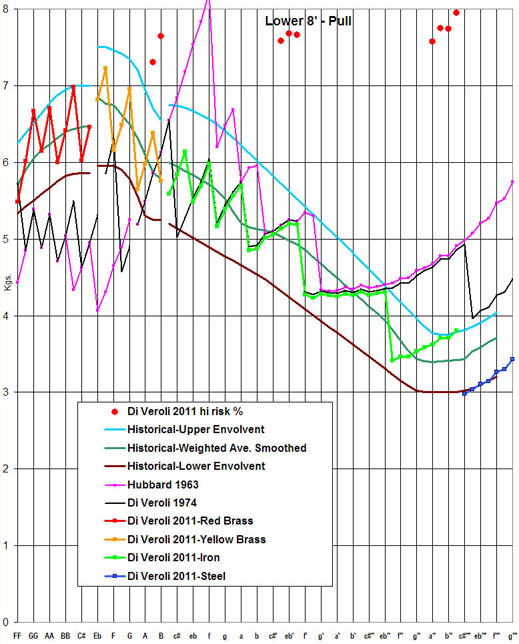
In the above "Lower 8'" chart three features are apparent:
- The Hubbard 1963 schedule on the 8' choirs [ | ] yielded pulls that were far away from any historical value.
- The schedule to which the Hubbard-Di Veroli was strung in 1974 [ | ] was significantly better, though pulls were still too low in the bass and two high in the top treble.
- The final 2011 schedule [ | | | ] closely follows the historical pulls.
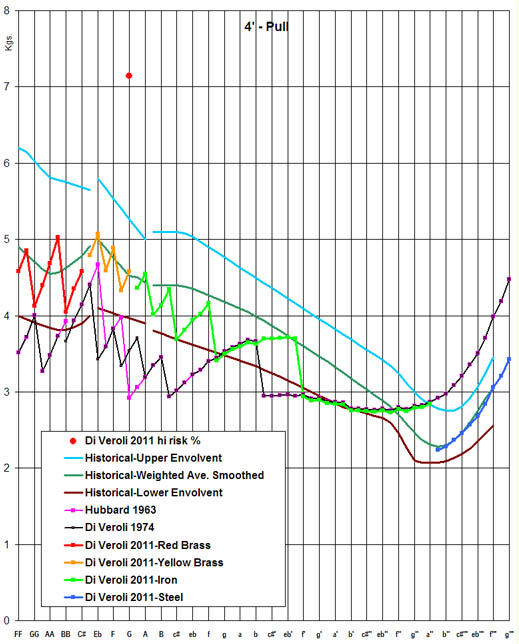
In the above "4' " chart it is apparent that both the 1963 and 1974 schedules for the 4' choir yielded bass and tenor pulls significantly lower than historical values. This issue was resolved with the new 4' schedule: however, to avoid a significant increase in the load over the boudin, the restringing kept the pulls slightly below the historical average in the bass and tenor range. As expected, no change whatsoever was observed in the soundboard around the boudin.
Having completed the project, with the instrument fully restrung from FF to d following the above charts, a significantly improvement in sound quality was achieved. Further, a very smooth timbre was observed, being virtually impossible to spot any of the alloy transitions in the instrument. After a thoroughly revised voicing, the restrung Hubbard-Di Veroli was successfully premiered in Bray in the Italian-French Harpsichord Workshop and Recitals in July 2011.
The final schedule shown above should fit reasonably well any harpsichord tuned to A=415.3Hz and based on 18th century French-models, provided the scaling of the instrument lies within 3% of Hubbard-Di Veroli's string lengths in mm, i.e. within the following tolerances in mm:
Lower 8' 4'
f'" 153 ±4 74 ±2
f" 277 ±7 124 ±3
f' 547 ±14 255 ±6
f 971 ±24 486 ±12
F 1410 ±35 773 ±19
FF 1752 ±44 1073 ±27
11. YOUR OWN SCHEDULE. (this section was added in June 2023). The Hubbard kit owner may find that his kit does not fulfil the above conditions in order to apply the above schedules, or else that he/she has already sets of coils for different alloys, or perhaps that he/she prefers to find the very best schedule for his/her instrument. Nothing beats to have your custom-made schedule, especially because I have already worked out for you the necessary minimum and maximum pull curves and the breaking limits. You only have to peruse the spreadsheet I developed decades ago and updated recently, which you can download by clicking here. It is valid for any Hubbard French kit and also for any harpsichord following the common 18th century French model. Please note:
- Copyright subsists, but feel free to edit any part of the spreadsheet for your own personal use. However, I suggest changing only the cells in blue.
- The different worksheets are self-explanatory. A few clarifications follow for the main "Calculation"worksheet.
- Temperament: you can select from four different temperaments in columns B to E. Just type a number 1 on any of the cells B3, C3, D3, E3, leaving the other three cells empty.
- Pitch: enter the desired pitch for A' in cell H3. You may for this purpose copy the values in cells I3 and J3.
- 8' Choirs: enter either 1 or 2 in cell P3. This serves only to calculate the TOTAL PULL OF ALL THE CHOIRS in cell U70.
- Length: in columns G and W you initially find some old values. Disregard them and enter your own vibrating string lengths in millimetres for each string (for the 8' measure the longer string of each pair), measured between the bridge pin and the nut pin.
- Wire: in columns H and X you enter the wire (alloy and size) you wish to use: feel free to experiment with any of the values in the table "WIRE ALLOYS AND SIZES"—which you can also modify at will—looking at the result in the other worksheets, which show curves of pulls and stresses for both the lower 8' and the 4' choir..
- The spreadsheet covers the chromatic range FF-f'''. If your instrument has also an EE, it should be strung with the same material as FF. If it has also f#''' and g''', they should be strung with the same material as f'''.
- Please email me only if you find (and once you have verified!) any error (which is unlikely after so many years). Please note that I will not provide advice or help in the use of this spreadsheet (mainly because, for users with no experience in harpsichord stringing and/or the use of spreadsheets, this can involve dozens of hours through days of communications.)
- Disclaimer: this spreadsheet is provided "as is", and I am not to be held responsible for its use, which is at the user's own risk.
12. THE PROJECT PLAN. Once all the technical information is ready, the tests are completed, the final schedule is calculated, and you have all the necessary tools and string coils, you should have a project plan. This is a simple list of stages that will prevent forgetting something until it is too late, and will include details particular to the specific instrument, such as repair work or a peculiar restringing order. You may simply copy the plan below, introducing the changes or simplifications you think fit. Please note that in the text below there is no explanation about string installation and voicing: the person carrying out the restringing is assumed to be conversant with these operations. The following was the Project Plan for the Hubbard-Di Veroli harpsichord:
SETUP
- Have the eye-making apparatus ready.
- If any string spacing needs improving by working on the bridge pins or nut pins (only needed if a wrong spacing is interfering with the action) do it now: if you accidentally break a string, it will be an old one anyway.
- Remove and store away the music desk, jack rail and jacks: you will reinstall them only after all the restringing operation is over.
- You do not need to remove the lid, which would leave the instrument uncovered for a long time, gathering dust. Open the lid a few degrees over 90º and have it resting on a wall.
- Quite obviously, ensure that the buff stop is turned off.
- The following section assumes that strings are changed from bass to treble. Write down the obvious changes if you prefer to remove all the strings first, and/or to proceed from treble to bass instead.
RESTRINGING (for each string)
- Remove the string. (Normally you remove a group of strings in order to work comfortably without touching newly installed strings.)
- Clean the soundboard, bridges, wrestplank and nuts below the removed string(s).
- If you are above a gap spacer, this is a good occasion to check and/or reinforce it.
- If you are above the buff stop lever, remove, clean, reinstall and check it.
- If you arrive to a soundboard crack longer than a few inches or thicker than a common sheet of paper, this is the time to repair it.
- Take the wire coil needed for the new string and make the eye (see the Appendix).
- Proceed to install the new string in the hitchpin and around the wrestpin.
- If the "coil" around the wrestpin is loose, tighten it up ("zip it") with a screwdriver while simultaneously turning the tuning hammer to tighten the coil.
- As you slowly pull the string up to pitch with the tuning hammer, continuously check the pitch by plucking the string with a feather or a plastic toothpick.
- Once the string has reached its final pitch, do not worry about tone quality, or slight drops in pitch after a few hours: traditional-alloy strings need a minimum of two weeks to settle and reach their final brilliance.
COMPLETION
- Store away the wire coils and the eye-making apparatus for future use.
- Reinstall the jacks and take note of any issues.
- You may find the action slightly misaligned, because (a) bass thick strings need a few days to settle to their final curves around the pins and (b) the new pulls have a slight effect on the shape of the instrument's case. If necessary, slightly amend the register motion regulation, just enough to have the action working.
- You will find that initially the brass strings sound too opaque and the iron strings too soft. You should now wait two weeks for the final settling of the frame and the new strings. Only then will the iron strings reach their final loudness; the brass strings may need even more time to reach their full brilliance.
- Two weeks having elapsed, proceed to an accurate tuning. The sound may still not be even.
- Now you should check thoroughly the alignment of the plectra. If a range of strings has had pulls increased or decreased, the case may have moved enough to throw some of your plectra slightly out of alignment. Re-regulate plectra or tongues as needed.
- Once the alignment of the plectra is checked, since they are now playing strings made of different wire materials, you should check loudness balance throughout and revoice as needed.
- During a few further weeks you will need to retune the instrument more often than usual, until the new strings reach a stable pitch. This should not require any further regulation of the action.
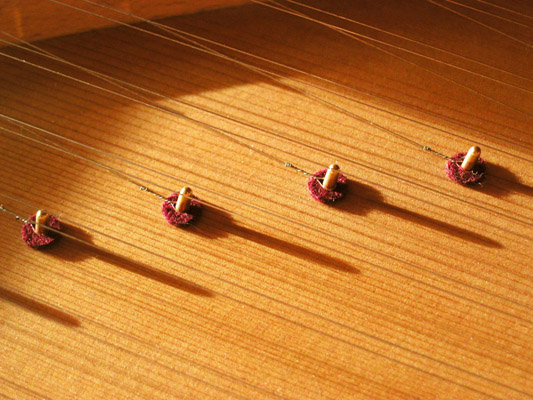
Appendix. MAKING A STRING EYE. Harpsichord strings are individually attached to the hitchpins by means of loops normally called “eyes”. Some webpages by different harpsichord makers show how to make an eye using only your hands and the hook included in a traditional tuning hammer. This is instructive of traditional practices and looks deceptively simple, due to the skill acquired by full-time harpsichord makers. However, most harpsichord owners and tuners very seldom change a string: without the necessary practice, the traditional procedure easily yields very irregular eyes, prone to slip or break under tension.
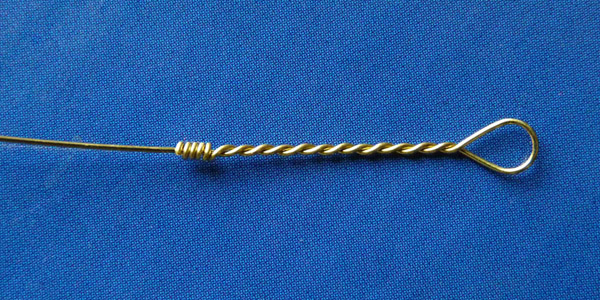
Some string vendors carry eye-making machines, but they are not easy to operate in order to guarantee the even tension required to make a tightly- and evenly-coiled eye. I prefer a more involved but foolproof operation, that yields very even eyes and requires a minimum of tools and skills. It is an elaboration after the basic directions that Hubbard included on p.46 of his Harpsichord Kit Instructions manual (c.1970). The final eye should look like in the following picture. The real-life length of this eye is about 2cm or 3/4in.
PREPARATIONS
- Tools needed:
- a small hook made by bending a nail with the same diameter as your hitchpins
- a hand drill (the kind sold online for school use is fine)
- small pliers (things are much easier using small locking pliers)
- a wire cutter
- a toe-nail trimmer
- a small vice secured to a bench or table
- Chuck the hook firmly in the hand drill.
- Mount the drill solidly in the vice, in such a way that the handle rotates horizontally.
- Have an—unskilled—assistant ready to help.
- Wear thin gloves to avoid oxidising the wire with the moisture from your fingers.
- Ensure that the part of the string where the eye will be made is absolutely clean. For an iron string, particularly prone to "slipping", clean it with alcohol.
- If you are making an eye as a preventive measure to be stored with the coil, take the coil out of its envelope being careful to avoid it unwinding.
- If you are instead making the eye to install the string immediately afterwards, you may prefer to take from the string coil the necessary length of wire needed: to the distance from hitchpin to wrestpin add about 1.5 ft (45cm), which you need for making the eye and for the coil around the hitchpin.
PROCEDURE
- The drill handle should be in an initial easy-to-remember position, e.g. in line with the hook, which should be pointing upwards.
- Carefully wrap the coil string around a cylindrical bottle (same diameter as the coil). For a single string, use some adhesive tape to secure one end to the bottle and coil the rest of the string around the bottle.
- Finally, use a large rubber band to keep the string from springing out. On the other end leave out about one ft (30 cm).
- Keep the bottle vertical in your left hand, the string leaving the coil from the outside of the bottle towards the drill.
- Clamp the end of the string with the pliers. Hold them with your right hand.
- The foot (30cm) of free wire between bottle and pliers is now making a curve of sorts towards the hand drill.
- Insert the middle of the free wire around the hook, and pull back firmly with both hands: the hook is now the vertex of an angle.
- Move around your hands, keeping firm pressure (always with more pressure in your right hand), so that the line from the drill bisects the angle "A" made by the free wire. See further below about the size of this angle A.
- Ask your assistant to rotate the drill's handle until the hook has rotated about 7 times for brass, 10 times for iron (you may prefer slightly more). This should be done slowly, say about 6 seconds per turn.
- While the assistant rotates the handle,
- keep the pressure of the wire against the drill.
- check that the angle is always equally bisected: if necessary amend using more pressure than movement.
- a varying angle prevents eye slipping: you should change continuously the angle. so that towards the end it approaches a new angle "B".
- the sizes of the angles A and B depend on your hitchpins and hook diameter and the pressure exerted while making the eye. You should experiment beforehand. For the Hubbard-Di Veroli we used A=45º and B=75º.
- Once the assistant has completed the turns of the handle, with your right hand open the pliers, letting the end of the string go.
- In your left hand (bottle) loosen the tension and move the bottle towards your belly in front of the drill so that it is positioned straight out from it.
- Ask your assistant to turn the drill handle back 1 or 2 counter-clockwise turns: this eliminates most of the torsion from the string.
- With your left hand, which keeps the bottle with the string always in line with the drill, apply now pressure again, even more than before, keeping the string very taut.
- Take the free end of the string after the eye, and move it to the right perpendicular to the main string.
- Turn the free end around the string. [Do it in the same sense of the coil: on the right hand side you push it down, let it go, catch it again on the left hand side and pull it up, then right and so on]. Continue until you have made four or five mini-coils around the string proper: this prevents the loop from unwinding.
- Cut off the excess wire with the toe-nail trimmer. You may alternative do it by "metal fatigue" turning the end around a few times. [Metal fatigue causes a better "blunt" finish, while the trimmer leaves an edge that may cause a cut if you inadvertently touch it with your fingers. If you are not a full-time harpsichord maker however, it is easier to use the trimmer, which further avoids the additional stress that the metal fatigue method may produce when carried out by less able hands.]
- Take the eye out from the hook.
- Take the wire out of the bottle. You can now either store the string or coil for future use, or move it to the harpsichord for its installation.
The procedure above looks complicated, but requires a few minutes per string, is easy to follow for amateurs, and guarantees very good results.
LITERATURE CITED. Find below the works cited in the text. A much more complete bibliography is included at the end of the third part of Taskin's Scalings and Stringings Revisited.
Adlung, Jakob. Musica mechanica organoedi. Berlin, 1768, vol.II p.105. Facsimile by Bärenreiter, Kassel, 1931.
Di Veroli, Claudio. The Hubbard-Di Veroli harpsichord. Bray, Ireland 2010.
Di Veroli, Claudio. Taskin's Scalings and Stringings Revisited. Bray, Ireland 2010.
Hubbard, Frank. Harpsichord Regulating and Repairing. Tuner's Supply Inc. Boston, MA (USA) 1963.
Hubbard, Frank. Three Centuries of Harpsichord Making. Harvard University Press, Cambridge, MA (USA) 1965.
Hubbard, Frank. Harpsichord Kit Instructions. Boston, MA (USA) 1965.
Hubbard Harpsichords. Stringing Lists from both versions of Harpsichord Regulating and Repair. P.1: Typical Stringing of Northern European Harpsichord. Framingham, MA (USA) 2007.
Irvin, Paul Y. "An Approach to Recreating Historical Sound" in Harpsichord & fortepiano Vol. 12 No.2 and Vol. 13 No. 1. England 2008.
Irvin, Paul Y. "Understanding Musical Wire" in Clavichord International. Bennebroek (Netherlands) 2010.
Raymond Russell. The Harpsichord and Clavichord. Faber and Faber, London 1959, 2nd. Ed. rev. 1973.
Page last updated: 18-Jun-2023